• Home
  • About
  • DIY
    • Accessories
    • Home Decor
    • Polymer Clay
    • This & That
    • Tips & Tricks
  • Contact
  • Shop

STUDIO ARTESANIA

facebook twitter pinterest instagram
Give your vase a spring makeover / Studio Artesania DIY
This is one of those Do It Yourself Projects that is great on style but light on the budget. What I like most about it, except that the used materials are not expensive, is the unlimited possibilities of design, as well as the ability to make a beautiful decoration from something unpleasant to the eye. It's great to hide ugly old vase or plant pot, to give a spring makeover to your favorite vase, to reuse the empty can that you would throw away, or to quickly make a vase from the glass. The possibilities are endless. All you have to do is to choose your paper straw color and pattern and spend about 15 minutes of your time to turn them into the cute home decor.
Paper straws are very cheap, and there are so many colors and patterns options. In this tutorial, I will show you two different ways to use those straws. The end result is much the same, but the way of the application is completely different so you can choose the approach that suits your need the most.

Bluish green vase with the white dots

Give your vase a spring makeover / Studio Artesania DIY
I have few vases, but my favorite is high glass vase that you can see on pics of several of my DIY projects. But, from time to time I like to give it a new look and decorate (change) it a bit. Since I don't want to make those changes permanent, I came with the solution that can be easily removed when I do not need or want that decoration anymore. The solution is removable vase cover, and here is how to make it.

Materials and tools

Paper Straws
Double-sided tape
Vase, glass or jar
Thicker paper
Scissors
Ruler
Tailor's meter
White paper ribbon

Step 1.

Give your vase a spring makeover / Studio Artesania DIY
Measure the volume of the vase, larger glass or the jar you want to cover. Take the thicker paper, measure and mark required length with additional 10 cm (4 inches) for bending. The volume of my vase is 26 cm (10 inches), so I measured the length of 36 cm (14 inches) but also marked appropriate length. The straws are 20 cm (8 inches) long, so in order to paper would be invisible the height should be about 15 cm (6 inches). Cut the shape of paper base with the scissors. It's important that paper edge that will go into the bottom of the vase is straight until you do not have to pay much attention to the upper part that later will be covered.

Step 2.

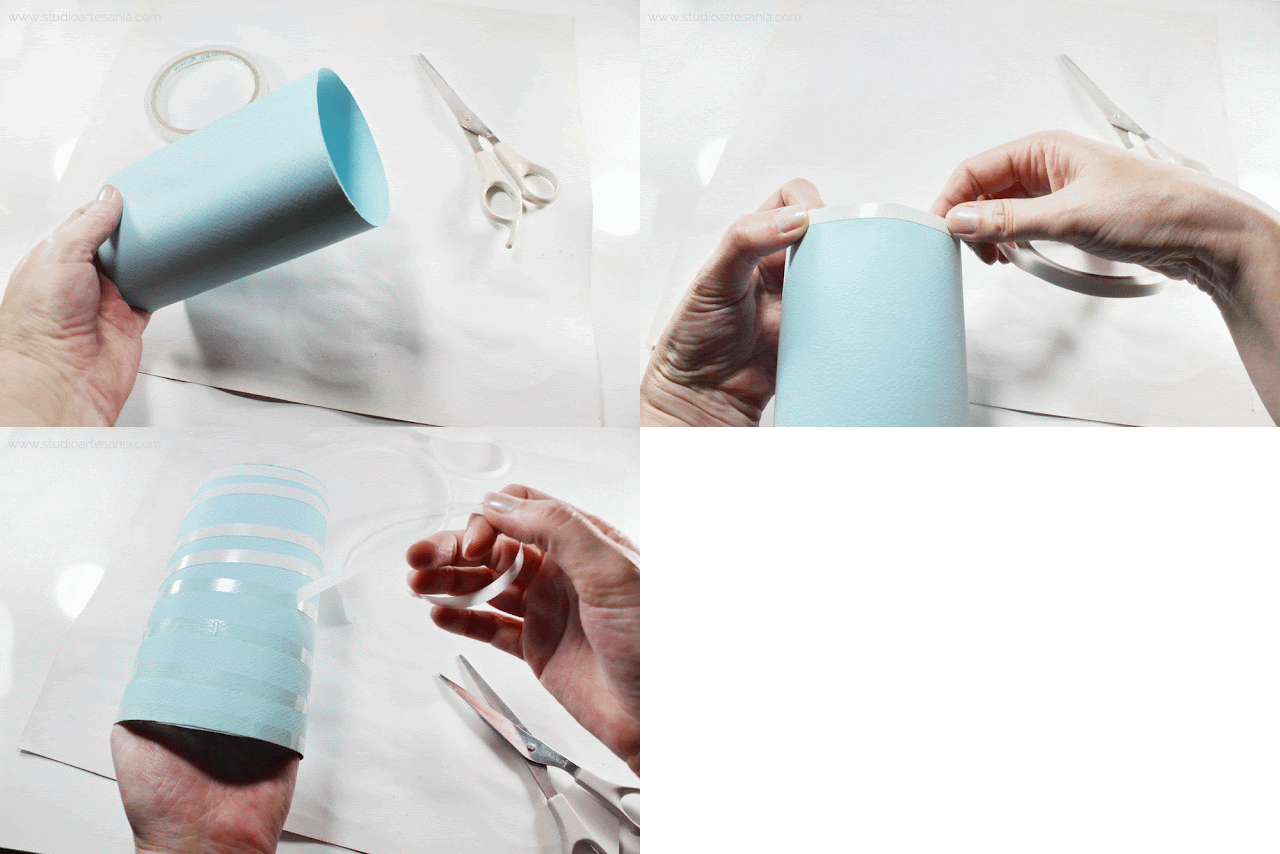
Place the stripe of the double-sided tape on additional part of the paper close to the mark of appropriate length (in my case on 26 cm/ 10 inches). Place another stripe of the tape on the edge of the paper, as well the third one in the middle. Remove the protective paper so that the tape is sticky on the other side.
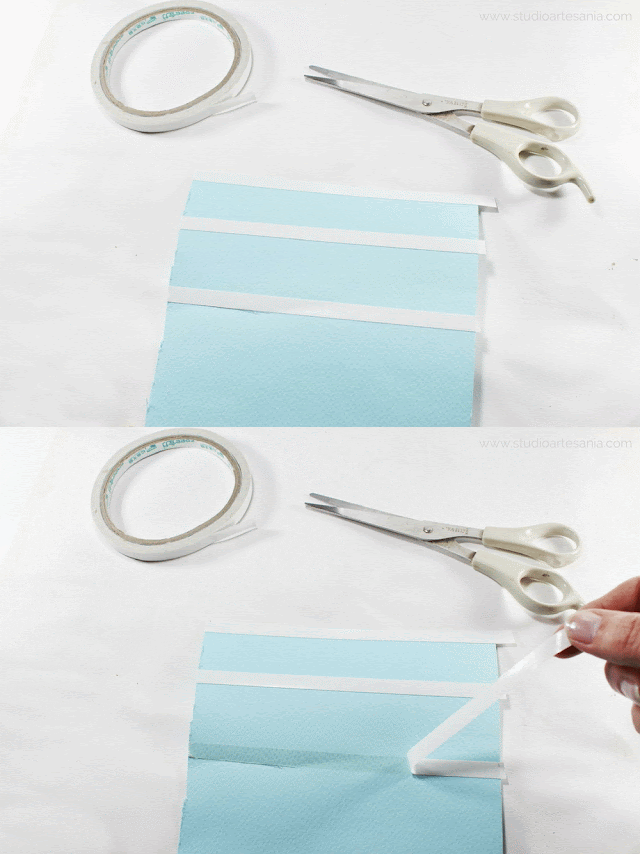
Give your vase a spring makeover / Studio Artesania DIY

Step 3.

Carefully bend the paper, align the edge with the marked line, and glue everything in place. The additional part of paper should be inside of the tube which will be wide enough to place your vase, glass or jar. Cover as much of the tube surface with the double-sided tape, making sure that the edges of tape and paper are aligned.
Give your vase a spring makeover / Studio Artesania DIY

Step 4.

Then stuck paper straws onto the tape. Firmly press every straw, so it sticks well. Make sure that the edges of the straws are aligned, as well that the straws are close to each other. For vase large as mine you will need two straw packages of 25 pieces.
Give your vase a spring makeover / Studio Artesania DIY
The great thing about this approach is that whenever you want you can remove the straws and stick other ones with different pattern or color onto the paper base. Just gently peel them off, and stick others in different color and pattern. Save the removed straws for another DIY project, but do not use them for drinking.
After few peeling and sticking the tape will no longer be strong, so just add several new stripes of double-sided tape on the base. If you don't want to change the design, you can attach the straws on the base with the paper glue. In that case, you should wait for the adhesive to dry before use of cover.

Step 5.

Give your vase a spring makeover / Studio Artesania DIY
To further secure the straws wrap and tie them with the white paper ribbon. Insert the vase inside the base, and put in your favorite flowers.
You can use this cover for different vases, just make the base wide enough for all of them. You can cover with it the glass or ugly jar, and that way gets an interesting vase. After you finish to use it as a vase cover you can place inside fairy lights and use it as a lamp.

White vase with the gold dots

Give your vase a spring makeover / Studio Artesania DIY
My cat Zvrle loves to eat certain types of food that are packed in cans. As an ecologically conscious being, I like to upcycle those cans, and this is just one of the project I made with them. This is, also, one of those multifunctional projects I love to make, because it can be used as pen or brush holder, a decorative pot for succulents, spices, and other plants, as a candle holder and as a vase for real or artificial flowers. You can use any can regardless of the size and depth, and there are instructions how to decorate them with the paper straws.

Materials and tools

Paper Straws
Hot glue gun
Can
Pliers
Jute Twine
Heart shaped wood sticker (optional)

Step 1.

Give your vase a spring makeover / Studio Artesania DIY
Remove the label from the can and clean it nicely. With pliers squeeze the sharp edges inside it. If you need, process edges additionally with a hammer to make sure that you can’t be injured on it.

Step 2.

Give your vase a spring makeover / Studio Artesania DIY
Measure and cut the straws. You want them to be slightly longer than the can is. Since the straws are 20 cm (8 inches) and the can I used is 8 cm (3 inches) long, I cut off straws in half (10 cm/ 4 inches). For can large as mine you will need one straw package of 25 pieces. After you finish cutting, stack the straws so that the cut part is one to the other. The cut part of the straw is slightly crushed, so you will easily recognize it. Do not worry if your straws are uneven, that just adds up to the design.

Step 3.

Give your vase a spring makeover / Studio Artesania DIY
Use the hot glue gun to place glue at the can. Quickly, before the glue hardens, place and firmly press the straw onto the can where you placed the glue and hold for a few seconds. Make sure that the cut part of straw is on the bottom of the can, as well that they are nicely leveled.

Step 4.

Give your vase a spring makeover / Studio Artesania DIY
To add a bit more interest to this sweet thing I wrapped and tied some jute twine around the middle of the white vase with the gold dots. I added a wooden heart sticker on it to hide the knot. Insert glass with the water and add a flower bouquet. You can also fill it with your favorite artificial flowers or put inside the plant in the pot.
Give your vase a spring makeover / Studio Artesania DIY
If you loved this blog post, go ahead and share it with your friends! And, if you recreate any of these DIY's please show it to me by using the hashtag #StudioArtesania!
Share
Tweet
Pin
No comments
Recently I posted an article about liquid polymer clay where I introduce you to this material. In that tutorial, I explained what is liquid clay, how to apply it, store it, for what you can use it, and how to bake it in the oven. Now I want to show you how to cure it with the heat gun. Also, I will share some of the mistakes I made when I started using the heat gun, what I learned from them and what you need to do to avoid those mistakes.
How to cure liquid polymer clay with a heat gun?

What is a heat gun?

A heat gun (often called hot air gun or hot air station) is a device used to emit a stream of hot air. Do not confuse the heat gun with the hair dryer, although they look very similar. Heat guns are made up of a source of heat, for example, an electrically heated element or a gas flame and have an electric fan that has the ability to move the hot air. It may also come with a nozzle that allows the user to direct the hot air towards a particular object. The nozzle comes in various different shapes, depending on the requirement of the user. There is a trigger on the handle, which when pressed turns the machine on. It may also come with an external stand if the user does not want to hold it for long periods of time.

Types of heat guns

Depending on the usage, the type of heat guns differs in terms of heat temperature and how the airflow is directed. On the market, there are two different types of heat guns that can be used for polymer clay. There is heat gun for the hobbyist which is mainly intended for scrapbooking, embossing and such things, and the professional/industrial heat gun that craftsmen use for stripping paint and varnish, loosening rusted nuts and bolts or thaw frozen pipes.
The main difference between those two heat guns is at a temperature and airflow they can develop. Also, they slightly differ in the design. The embossing heat guns are looking more like a stick, and they have a built-in stand, until industrial are bulkier and they usually have the form of an elongated body pointing at what is to be heated, with a handle fixed to it at right angles and a trigger, in the same general layout as a handgun.
Embossing heat gun (often called mini heat gun) has lower temperatures range (approximately from 100 to 300 ° C/212 to 572 ° F, depending on manufacturer) until the professional one has higher temperature range (approximately from 300 to 800 ° C/527 to 1472 ° F, depending on manufacturer). Those temperatures from the heat guns far excide what you need to cure polymer clay. To remind you, the ideal temperature for Fimo is 110 ° C (220 ° F), for Sculpey 130 ° C (266 ° F), and for Kato 150 ° C (302 ° F).
So if you use embossing heat gun set it at 200 ° C (392 ° F). I use an industrial heat gun that I got from my dad, and its temperature range is from 350 to 600 ° C (662 to 1112 ° F). I always cure the liquid clay on lowest temperature, which is 350 ° C (662 ° F).
How to cure liquid polymer clay with a heat gun?
It's hard for me to recommend which one of those two heat guns you should get. I love my industrial heat gun, and it will work great for you as well if you will use it only for polymer clay. But, if you want to use it for other artistic things, such as embossing, then get a hobbyist one. You know better what your artistic/crafters needs are, so get the heat gun according to them. The industrial heat gun you can find in every hardware store and embossing heat gun is available in craft stores. If you have the opportunity to check the heat gun you want to buy, make sure that it does not blow all around. The jet of hot air must be pointed (preferably with a nozzle) and blow needs to have the less forced flow.

Can I use a hair dryer?

This question I've heard very often at my workshops and the answer is - NO, you can not. Although not called such, a hair dryer is basically a form of a low-temperature heat gun. However, hair dryer and a heat gun are not the same and are also used in different contexts. Hair dryers are well for drying hair mostly and can also be used sometimes in case of a heat gun, for example, to dry thicker layer of acrylic paint on canvas. A heat gun emits much higher temperatures compared to hair dryers and is used for commercial purposes. It should never be used on the hair as it can result in singeing the hair. These are two completely different devices and should not be used interchangeably.

Baking surface

When I got my heat gun I did not have a clue how to work with it, and how to use it for polymer clay. At that time there was no tutorial to explain how to cure the polymer clay with it, and the only one I found, I know that now, was incomplete and inaccurate. So, I made three big mistakes and learned a lot from them.
I did not think and at the beginning, I used the glass as the baking surface. Thick glass, but glass! Eventually, that glass has burst from heat. I do not know what was more annoying - a destroyed piece of jewelry I worked on or the fact that I've been collecting pieces of broken glass scattered all over my apartment for the days. Luckily I wasn't hurt, but when that glass broke everything could go wrong. I could get cut, the piece of glass could end up in my eye... Even now I'm scared to think what can happen because I did not use my brain. That was my mistake number one from which I learned to never ever use glass for curing the liquid polymer clay with a heat gun.
Then I started to use ceramic tile as a baking surface. It worked as a charm until one day I noticed traces of ignition (not burns per se, but yellowish traces similar to those when you place a hot cup of tea on the table without coaster) on my wooden working desk. It was an old desk, but anyway I did not want those traces on it. I knew that my heat gun is strong and that it could develop a high temperature, but I completely forgot that the ceramic can transfer the heat. I wasn't thinking! Again!
Maybe now you think I'm completely crazy because a lot of polymer clay artist (me included) use ceramic tiles as work surfaces, as well as baking the clay in the oven, but the fact that ceramics and porcelain can absorb temperature is the reason why those tiles are used as a floor covering for underfloor heating. That's why you have to check when you buy a cover for underfloor heating, the thermal conductivity of tiles, which means how well the floor material of your choice transfers heat from the heating system to the surface of the floor. Just remember how many times you burn your fingers on a ceramic or porcelain cup full of warm tea or coffee and you'll know what I'm talking about. Since the ceramic tile can warm up a lot of polymer clay artist (including me) use it during the baking to keep the temperature underneath the clay even.
I was in the hurry to finish the large order and I did not let the tile to cool down between pieces I needed to cure with a heat gun, so the tile has warmed up to the point that it began to leave marks on the table. That was my mistake number two from which I learned to always place a ceramic tile on the surface that can't be burnt. And, to let it cool down after every use no matter how much I'm in the hurry.
After those two fiascos, I start to use my brain and remembered the firebrick I had from days when I worked with pottery. Ever since I use it when I cure liquid polymer clay with a heat gun. The firebrick can stand high temperature (depending on the type it can stand the temperature of 1500 ° C/2732 ° F), and it can't transmit that temperature easily on other surfaces. As we finish the baking with a heat gun that lasts for about a minute or two, the brick does not even get warm, which protects our desks.
How to cure liquid polymer clay with a heat gun?
But, what you will do if you do not have firebrick? Since my parents live in another city, pretty far from where I am, and my firebrick was in their house, until I took that brick I worked on my balcony, the only place in my apartment that has concrete surface. That worked very well because concrete can't heat up easily, and it can't get burn with a heat gun. So, the solution is to find the concrete surface in your surrounding and to work there. I know it can be hustle, especially during the cold winter days, but better to be safe than sorry.
Learn from my mistakes and always work on the heat-resistant surface. If you want to work with polymer clay seriously and you intend to use liquid polymer clay as a glaze or filling a lot I highly recommend you to, as an addition to ceramic tile, get a firebrick as a working surface. If you cure one to two pieces per day or week you can use ceramic tile, but place it on the concrete floor. 
If you work with a heat gun on an already baked piece of clay in order to get the glazing and filling more transparent than you can place it directly to the firebrick. There are some techniques that require baking the sheet of liquid clay with the heat gun as an application for the piece that latter will be baked in the oven, so in that case, put the firebrick beneath the ceramic tile. The firebrick you will find in shops for pottery artist or in local shops where you can get parts for the fireplace or pizza stoves. Also, it can be purchased in certain craft stores, as well online.

Curing techniques

When I got my heat gun I was so excited and I could not wait long to try it. Immediately I grabbed one of the pieces of jewelry glazed with liquid clay and previously baked in the oven, take out my heat gun, point it in the clay and started it up. After few seconds I noticed smoke followed by a terrible smell. I wanted to make the glaze more transparent, but I ended up with a burned piece of jewelry. I already told you that at that time I find online only one tutorial for using a heat gun with polymer clay, and in that tutorial was stated that the heat gun must be very close and pointed in the clay. What a disinformation! That was my third mistake!
That night I talked with my dad over the phone and I started to complain about heat gun, burnt piece of jewelry and how I do not know what I did wrong since I followed that tutorial exactly from word to word. Among other things, he told me that when he uses a heat gun for stripping paint he do not point it at one place, but move it around the surface, and hold it away of the surface he treats. He advised me to try it that way. Next day I started to experiment. I made few test pieces and tried to figure out how to use that heat gun.
How to cure liquid polymer clay with a heat gun?
So, here is what I learned from my experiments - you must move that heat gun. Move it up and down, left and right, in a circular motion, however, but keep it moving and rotating. If you point the heat at one place, and since the air is hot, you will burn that spot. Therefore, moving the heat gun is very important. Your movements should be even and at medium speed. By moving, you distribute warm air equally to the entire surface and prevent to burn it.
The distance between the clay and heat gun is also very important. If you use embossing heat gun you will hold it 8 to 10 cm (3 to 4 inches), and industrial at 12 to 15 cm (5 to 6 inches) away of clay. These measures are just references. When you cure the clay with heat gun for the first time I suggest you take some of the pieces that are not so important to you, or make few test samples, to place the heat gun at highest point (around 20 cm/8 inches) from the clay, and while you moving it in circular motion slowly lower it down until you find the distance that works the best for you, and where your clay will not burn. You may burn some of those test samples, but at least you will know the high you have to hold your heat gun when you work on more important pieces. Experimentation is highly recommended before applying this method to your finished piece. Every heat gun is different and it will take you a little while to master it. You will burn few pieces during practice, but after that, you almost never will burn applied liquid clay.
Also, know that the closer you are to the clay the faster you need to move the heat gun. If you notice the smoke move the heat gun away from that section and let it cool down. You can use this method not just for liquid clay, but also for regular polymer clay pieces that are not very thick or as an option prior to conventional oven baking to help prevent flattening of edges while on the baking tray.

Is it cured?

To know that your liquid clay is sufficiently cured look for the changes in the surface of the clay, as well as overall transparency to indicate when the liquid is clear. When your clay is clear, and usually it takes about a minute or two depending on the thickness of the coating, that is the point when you have to turn off the heat gun. Then let the clay to cool completely. If you want to speed up the cooling process carefully transfer your piece so you do not get burn to the bowl of cold water.

Safty measures

When you use a heat gun you must always be aware of the risk of burning polymer clay, so always work in the well-ventilated area. During the heating avoid putting your hands or anything that can be melted or burned in front of the jet of hot air. After you finish, place the heat gun on the heat-resistant surface. Don't touch the tip of the heat gun or place it close to anything that can melt or burn. The tip will be very hot and it could easily burn you or destroy your belongings. 
How to cure liquid polymer clay with a heat gun?


If you like this tutorial share it on your favorite social network by clicking the buttons down below.
Share
Tweet
Pin
No comments
Photo of jewelry set (necklace and earrings) in turquoise blue and silver
In jewelry creating, the shape and size of the beads can enhance or destroy our design. This is especially important if we use materials such as polymer clay (or any other clay) for jewelry making. Many years back when I discovered polymer clay I only could find cookie cutters in standard shapes, such as rhomb, triangle, heart, and circle. Since I like to make bigger pendants and focal beads their size did not suit my needs, and naturally, I wanted to have a choice of different shapes. So, after several trial and errors, I figured out how to make my own templates which I can use over and over again.
These days we can buy all sorts of cutters, templates, and stencils which make it easier for us to shape polymer clay, but sometimes they are pricey or we want to use the specific shape in a certain size that we can't find anywhere. The solution is to make your own custom templates. They are great for shaping and creating jewelry from polymer clay, air dry clay, porcelain, metal clay, ceramic, leather, plastic, metal sheets and all sorts of other materials. Once you learn how to create your own templates you will have a plenty options for using them in a lot of different DIY projects, not only for jewelry making. As well, they will help you to differ your design from others. I use custom made templates constantly, and you will see them in many of my previous and future DIY projects I share on my blog. Creating of custom templates for jewelry making is similar to those hearts I show you in the tutorial for Elegant cards, but now I will share some of my trade secrets and tips and tricks. So, let's get started!

Materials and tools

Printing paper (A4)
Pencil
Eraser
Ruler
Scissors
Curve ruler
Plastic folder
Non-permanent marker
70% rubbing alcohol
Cotton pads

Step 1.

Photo of hands that folding paper
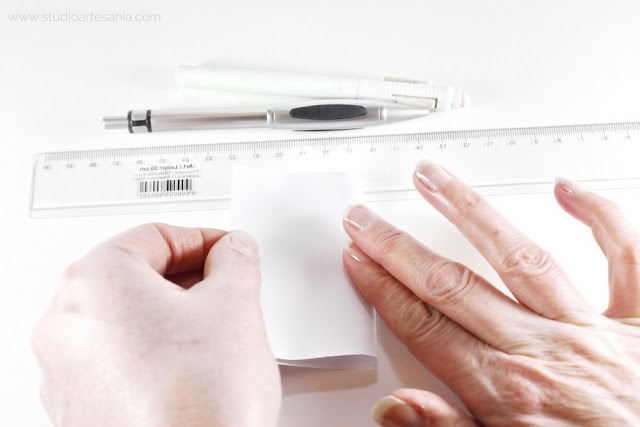
Cut the printing paper in several different sizes. Take a piece of printing paper and fold it in half so the edges are side by side.

Step 2.

Photo of hands folding paper
Press the crease with fingers to flatten it.

Step 3.

Photo of the hands drawing the template
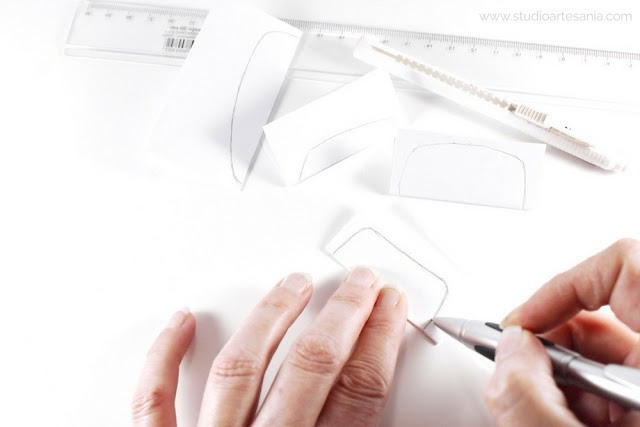
Draw a half of the desired shape on the paper keeping in mind that the folded part of the paper will be the center of the template. You can draw the half of the shape freehanded or if you want to be precise, use the ruler to measure the desired dimensions.
Photo of the hands drawing the template
Mark the dimensions with the pencil and connect the points using the regular ruler for straight lines or curve ruler for curved lines. 

Step 4.

Photo of the hands cut the template with scissors
Cut out the pattern along the lines and unfolded it. You will get a perfectly shaped template.

Step 5.

Photo of different templates
I will show you in another tutorial how to use these templates on a polymer clay, but for now, you need to know that you can't use folded templates on it. The fold will imprint on the clay and ruin your work. A solution to this problem is the plastic folders. They are cheap, and from one folder you can make a lot of templates. It is best to use transparent folders so you can see through it. Split and cut the folder to get flat pages. With a double adhesive tape attach the base template to the foil and trace its shape with a non-permanent marker. Remove the base template and the tape from foil. Cut the shape with the scissors or with X-Acto knife for greater precision.
Photo of the hand holding the templates
Remove the excess of the marker with the cotton pad on which you drip a bit of rubbing alcohol. If you want you can write the measurements of the template in the middle of it with a permanent marker, but then make sure you do not put marked side of a template onto the clay.
You can transfer the shape of the template on another flat piece of paper in case you would not use it often, but know that plastic one is better and durable. That's it! Your templates are ready to use.

Tips, tricks, and few ideas

Photo of the hands drawing the template with the cup
      • If you do not have curve ruler you can use cup, bowl or plate. They also came handy for creating different sizes of circles and semicircles. You can use a cup, bowl, and plate to make various shapes of leaves. 
Photo of different templates
For semicircle unfold the template and cut it in the half with the scissors, or if you want to be precise use ruler and an X-Acto knife. Also, you can use a divider with a pencil to make a perfect circle.
Photo of the hands cut the template with scissors
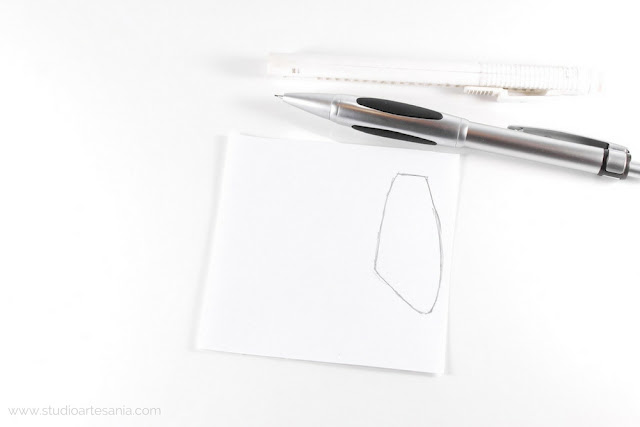
      • For a form where you do not want sides to be identical, you first need to make a base template. Place the base template with the identical sides on the other piece of paper (do not fold that piece) and trace the shape with the pencil. Then draw the changes. Carefully erase the lines you do not need, and cut the shape.
Photo of the pencil and template
      • To make the same template in various sizes you will need several folded pieces of paper and base template. Bend the base template and place a folded piece of paper in the middle of it. Trace the lines of the base template on the paper. Remove the base template. Measure and mark the dimension of smaller or bigger shape, and connect the points. Cut the shape with the scissors. Repete the process until you get all the variations of the desired size of the same shape.
Photo of different templates
      • I store my templates in zip bags which are placed in the box in the drawer of my desk. On every zip bag I wrote the measurements of the template with a permanent marker. This way I can easily find the one I need and return it to its place when I finish working.
Share
Tweet
Pin
No comments
How to soften old and crumble polymer clay? Just follow the steps in this tutorial, and working with hard, old and crumbly polymer clay won't be a hassle for you anymore.
Polymer clay, basically, does not have a shelf life. Of course, it's always easier and better to work with fresh polymer clay, but if properly stored (even outside the original packaging), and if it is not exposed to heat (radiators, heaters and other home appliances) or direct sunlight (near the window), polymer clay can last for years. The problem is that it gets harder over the time because particles of PVC and softeners, which are part of polymer clay, tend to separate. The softener in the clay, which is on an oil base, have a tendency to leak and/or evaporate over time, so the PVC particles become misplaced and dried. When you take an old polymer clay into your hands it starts to crumble because PVC particles do not have enough softener to re-distribute and bind again. But this clay is certainly not unusable, so do not throw it away. The solution is to add softener and that way the PVC particles will re-join, and clay will get the desired flexibility and workload. Some clays, such as Fimo professional, has a tendency to crumble even when is fresh, so steps in this tutorial will help you to the condition it faster and much easier. In this tutorial, I deliberately used very, very old clay (yellow and greenish blue Fimo Classic, that is no longer produced, and which I bought sometime in 2010) in original packaging as an evidence that, with a little love and effort, it can be usable again and returned to a softer state.

About polymer clay softeners

How to soften old and crumble polymer clay? Just follow the steps in this tutorial, and working with hard, old and crumbly polymer clay won't be a hassle for you anymore.
There are two types of softener manufactured especially for polymer clay - in solid (Fimo Mix Quick) and liquid (Sculpey clay softener) state. Look for them in arts and crafts supplies stores near the polymer clay. If you can't find one of this softeners locally, they can be ordered online.
Mix Quick is primarily intended for increasing the flexibility and softening the Fimo polymer clays (Professional, Doll, Soft and Effect), but in my experience, it works very well with other clay brands too. This softener is packed in a plastic wrapper, it looks similar to classical polymer clay bar, and it weighs 100 grams (3.5 oz). Its color is milky white, but after processing and baking, it becomes transparent and invisible. It's soft to touch. After opening the original package of Mix Quick is broken, so to keep it fresh wrap it with cling foil and store it in the zip bag away from direct sunlight and heaters. The cling foil is necessary because Mix Quick has a tendency to dry over the time.
Sculpey clay softener is clear, slightly blurred liquid. It is primarily intended for Sculpey polymer clays (Premo, Souffle, Sculpey III, Super Sculpey, Ultra Light), but you can use it for other clay brands as well.  It comes in a plastic bottle and it weights 30 ml (1 fl oz). Elongated tip on the squeezable bottle makes it easier to measure droplets. It's oily to the touch. Store the Sculpey softener in original package (opened bottle is protected with the cover) away from sunlight and heaters.

Preparation

Before you start adding softener it's necessary to prepare clay so your job will be easier and faster. There are two preparation steps, and I highly recommend that you do both. Also, it's good to combine those two, and I will explain how to do it down below.
Warm up the clay - Place the clay (in the original package or unwrapped, it's your choice) in the zip bag. Then sit on the clay or put it under the armpit, as this procedure will make it easier for you to continue softening it. I know, it sounds funny, but it works. The heat of our body is high enough to warm up the clay, but also low enough not to bake it. The minimum time that you need to warm up the clay is about 15 to 20 minutes, but the more you warm it up with your body it's the better. While you're working on a computer (for example, reading posts on my blog) or watch a movie, you can use that time to warm up the clay. If you squeeze the clay after warming, you will notice that it's a bit softer then when you started the process.
If you have pets you can place zip bag with clay in their beds, and cover it with an old blanket or towel. Pets body temperature is slightly higher than humans, but it's also safe for clay. Never, ever, in any case, do not warm up the clay by putting it in hot water or near a heating bodies, because you will partially bake it and then it will not be savable. Sitting on the clay, putting it under the armpit or in your pet bed is the safest way to warm up the clay. You can use this method with fresh clay too, and that way make conditioning easier and faster. For fresh clay, 10 to 15 minutes of warming up with your body will be sufficient.
Beat up the clay - This method is bit crazy, but it's so helpful in the clay softening process. For this, I use a rubber mallet (a tool used during ceramic tile or laminate floor placement, and sometimes is called soft mallets), but a regular hammer or acrylic roller will do just fine. Place zip bag with clay on the floor, take your mallet and smash the clay firmly few times on all sides. Beside this is a great way to release the stress, by beating the clay you will help PVC particles to move and distribute evenly. You will notice that the clay has slightly deformed and flatten, which means that you had done a great job. This method is great for very, very old clay which has stayed on the shelf or in your drawer for long period of time (for e.g. few years) and it's super hard, but it can be used on fresh clay too. Also, you can hit the clay few times before warming it up with your body, and of course after that. That will help the softening process even more.
How to soften old and crumble polymer clay? Just follow the steps in this tutorial, and working with hard, old and crumbly polymer clay won't be a hassle for you anymore.
I know that on the market are a tool called Never Knead. It's machine especially created for conditioning polymer clay, and it smashes the clay under the pressure, but since I didn't try it I can't tell you more about it. It's quite pricey and with additional costs for postage and customs duties I can afford it, so, for now, I will stick to my trusty rubber mallet. By the way, you can find rubber mallet in any hardware store.
How I prepare the clay - After I pack the old clay in the zip bag I will hit it few times with the mallet, and place it under the old towel in my cat's bed to warm up overnight. In the morning I will beat up the clay again, and then unpacked it and start conditioning and adding softener.
I use this combo even for fresh clay, as part of conditioning, but then after the first beating, I warm the clay with my body for about 15 minutes. Until I finish preparing all stuff I need for claying, the clay on which I sitting has warmed enough. Then I will hit it a few more times with the mallet.

Softening clay with Fimo Mix Quick

Step 1.

How to soften old and crumble polymer clay? Just follow the steps in this tutorial, and working with hard, old and crumbly polymer clay won't be a hassle for you anymore.
Unpack the Mix Quick, cut out a very thin tile of softener, and then from it cut a small piece about 1 centimeter (0.39 inches) long.

Step 2.

How to soften old and crumble polymer clay? Just follow the steps in this tutorial, and working with hard, old and crumbly polymer clay won't be a hassle for you anymore.
Unpack the clay and with a blade cut it into small pieces.

Step 3.

How to soften old and crumble polymer clay? Just follow the steps in this tutorial, and working with hard, old and crumbly polymer clay won't be a hassle for you anymore.

Get few chunks of clay, knead them with your hands, and form a small irregular ball. You will notice during the kneading that the clay start to crumble, but do not worry about it.

Step 4.

How to soften old and crumble polymer clay? Just follow the steps in this tutorial, and working with hard, old and crumbly polymer clay won't be a hassle for you anymore.
Squeeze the separated part of the softener with your fingers, and add it to the clay ball. Knead them together with your hands.

Step 5.

How to soften old and crumble polymer clay? Just follow the steps in this tutorial, and working with hard, old and crumbly polymer clay won't be a hassle for you anymore.
Alternately knead and add to the ball new pieces of clay until you connect all of the cut pieces. If necessary, add one to two pieces of softener. Always measure a very small amount of softener that you will mix into the clay. According to the instructions, it is best to measure 1/8 of the softener in relation to the amount of clay. Although, I always work by feeling. I put a very small amount of softener at the beginning, and gradually adding more Mix Quick if I feel under my fingers it's necessary.
It is better to gradually add smaller quantities of softener in the clay, then to mix a larger amount at once. Because the clay with too much softener can become mushy. Too much softener can slightly change the color of the clay, so you should know that the maximum mixing ratio is 2/3 of the clay and 1/3 of the Mix Quick.

Step 6.

How to soften old and crumble polymer clay? Just follow the steps in this tutorial, and working with hard, old and crumbly polymer clay won't be a hassle for you anymore.
With the piece of the clay that is softer than before, pick up those chunks that were scattered on the working surface during the early preparation. Mix them with the rest of the clay.

Step 7.

How to soften old and crumble polymer clay? Just follow the steps in this tutorial, and working with hard, old and crumbly polymer clay won't be a hassle for you anymore.
Flatten the balls with the roller, and put the one tile on top of other. Clay tiles don't need to be very thin. Roll all the clay like this until you have one tile.

Step 8.

How to soften old and crumble polymer clay? Just follow the steps in this tutorial, and working with hard, old and crumbly polymer clay won't be a hassle for you anymore.
Pass the clay tile at least 10 times through the clay machine on thickest setting (on most machines that it's setting number 1). If the clay is still crumbling put a small piece of Mix Quick on tile, and pass it through the machine until you get uniform and smooth tile. Overall, it is necessary to overlap the clay tile and pass it through the machine about 20 times in order to allow the softener to spread evenly and clay becomes flexible again and ready to use. Then set the machine on setting 2, and roll the clay tile few times on it. Switch over to setting number 1 and roll the clay few more times.

Step 9.

How to soften old and crumble polymer clay? Just follow the steps in this tutorial, and working with hard, old and crumbly polymer clay won't be a hassle for you anymore.
You can put back the clay into a zip bag and leave for few days to absorb Mix Quick even more, but basically, your clay is ready for use right away. You can store softened clay in a zip bag, and it will remain soft and pliable for work for several months.

Softening clay with Sculpey softener

Step 1.

How to soften old and crumble polymer clay? With my tips and tricks, you will easily bring back life to your old, hard and crumbly polymer clay.
Unpack the clay and with a blade cut it into small pieces.

Step 2.

How to soften old and crumble polymer clay? With my tips and tricks, you will easily bring back life to your old, hard and crumbly polymer clay.
Get few chunks of clay, knead them with your hands, and form a small irregular ball. You will notice during the kneading that the clay start to crumble, but do not worry about it.

Step 3.

How to soften old and crumble polymer clay? With my tips and tricks, you will easily bring back life to your old, hard and crumbly polymer clay.
Squeeze one to two drops of Sculpey softener on to the clay.

Step 4.

How to soften old and crumble polymer clay? With my tips and tricks, you will easily bring back life to your old, hard and crumbly polymer clay.
Knead the clay and softener with your hands.

Step 5.

How to soften old and crumble polymer clay? With these tips and tricks, you will easily bring back life to your old, hard and crumbly polymer clay.
Gradually add few more chunks of clay into the mixture. Continue kneading and adding new chunks of clay. As the clay absorbs the softener, it will become soft and smooth, removing any crumbling. If your clay still isn’t pliable enough, add a little more softener. Just make sure to use it sparingly (mix in a drop or two at a time) so you don’t make the clay too mushy. If it easier for you, work with the smaller amount of clay and later connect them to one piece.

Step 6.

How to soften old and crumble polymer clay? With these tips and tricks, you will easily bring back life to your old, hard and crumbly polymer clay.
Flatten the clay with the roller.

Step 7. 

How to soften old and crumble polymer clay? With these tips and tricks, you will easily bring back life to your old, hard and crumbly polymer clay.
Pass it through the clay machine on thickest setting (on most machines it's setting number 1) at least 10 times. Then set the machine on setting 2, and roll the clay tile few times on it. Switch over to setting number 1 and roll the clay 10 more times. At first, clay may be crumbly when you pass it through the machine, but at the end, the softener will spread evenly and clay will become flexible again.  

Step 8.

How to soften old and crumble polymer clay? With these tips and tricks, you will easily bring back life to your old, hard and crumbly polymer clay.
You can put back the clay into a zip bag and leave for few days to absorb Sculpey softener even more, but basically, your clay is ready for creating right away. You can store softened clay in a zip bag, and it will remain soft and pliable for work for several months.

Alternative methods of polymer clay softening

There are three additional solutions to soften old polymer clay in case you do not have Mix Quick or Sculpey softener.
Liquid clay - This is my favorite method for softening old clay. Although I have Mix Quick and Sculpey softener, I use liquid clay to bring the life into old clay for years. I also use it when I condition fresh Fimo Professional, and sometimes I know to add a drop or two of liquid clay in the mixture of clay and softener since this makes the whole process faster and much, much easier. And, I had never had any problems with the clay I added liquid clay in.
Another reason I love to use liquid clay is that the softeners can be pricey, especially if you order them online. I can bet that every bit more serious clayer has liquid polymer clay at home. So, use it and save the money. If you do not have it buy it because you can use liquid polymer clay for various techniques, while the softener only serves for softening. The principle of softening clay with this material is the same as with Sculpey softener so you can use that part of instructions as a reference. Just keep in mind that you can't use colored liquid clays for this. For softening you can use only translucent liquid clay.
How to soften old and crumble polymer clay? Just follow the steps in this tutorial, and working with hard, old and crumbly polymer clay won't be a hassle for you anymore.
Translucent polymer clay - Mixing translucent clay into your old polymer clay can also help, since this clay is usually quite a bit softer than the other colors. The principle of softening with translucent clay is the same as with Mix Quick so you can use that part of instructions as a reference. I use translucent polymer clay in rare cases when I stay without liquid clay and/or softeners.
Mineral oil - Though not manufactured for the purpose, clear, odorless mineral oil can be mixed into dry polymer clay to return it to a softer state. Use it in the same way as you would Sculpey softener or liquid polymer clay. Mineral oil is stocked in the pharmacy department of most stores. 
I will admit, I do not like to use mineral oils with polymer clay at all. Many years back when I started working with polymer clay I used it for a while, and I do not have happy memories about it. Maybe the problem was in the type of oil I used, I do not know, but my clay wasn't durable. Regardless of how little oil I'd put in clay, it would always crack under slight pressure. On another hand, I know many clayers who use mineral oil for years without trouble. So, it's up to you to try it or not. But, according to my logic, it is better to invest money in a liquid clay or softener manufactured especially for polymer clay then into something that may or may not be good.
Share
Tweet
Pin
No comments
Older Posts

HEY There!

About Studio Artesania

I'm Anya! I’m so happy you are here. I’m artist & crafter that thinks that everyone can and should take the time to make things every now and then. I love to share ideas and hopefully inspire others to create. Want to know a little more? Check out the about me page.

Follow

Join The Mailing List

About Studio Artesania

Featured Post

DIY Glitter Vases

Labels

Accessories DIY Home Decor Polymer Clay This & That Tips & Tricks

Reader favorites

  • What is liquid polymer clay and how to use it?
  • How to cure liquid polymer clay with a heat gun?
  • How to use Fimo varnish on polymer clay?
INSTAGRAM @STUDIOARTESANIA

LEGAL INFORMATIONS

Created With By BeautyTemplates

© Copyright 2025 Studio Artesania

All rights reserved